~Home-Urbit and the Sovereign Stack
Table of Contents

Urbit is one of these projects that it’s enticing and overly complex at the same time. It’s one of these few rare projects that have managed to be equally artistic and technological.
Urbit’s promise is simple. Create the personal server, a computer that is designed to wor in a decentralized, natively p2p network and coupled with a unique digitally scarce identity.
If you are not familiar with the project, I highly suggest you read my Twitter thread and the Understanding Urbit blog post series by Tlon and the Urbit Foundation.
Home-Urbit
Home-Urbit is my humble contribution to the wider Urbit ecosystem. I leveraged my IoT and DevOps background to create a turn-key deployment of Urbit for self-hosting it on a Raspberry Pi. Home-Urbit is your server, that is hosted at home, with complete ownership of the data and the applications that support it.
Although most prefer to run Urbit on a VM that is accessible by the wider internet (say a Digital Ocean droplet), I wanted to take a different route. I believe that just the fact that I am running Urbit, it indicates certain values and a willingness to go the extra mile for privacy and security. Running Urbit on a VM defeats the purpose because even if you get to access Urbit’s groups and community, your data are stored on a machine that can be turned off at any time. Moreover, Urbit currently saves its event log on a plain text file, meaning that it can easily be read by the VM admin.
For that reason, I started exploring how I can permanently run Urbit on a raspberry-pi server. This is preferable to having it ran as a process on my computer, consuming resources, and being offline at regular intervals.
The Sovereign Stack
Having worked in both the Infrastructure Monitoring and IoT DevOps space, I had some familiarity with the solution space. It didn’t take me long to realize that what I wanted was to containerize Urbit and have it delivered to my Raspberry pi as part of a software suite.
This software suite is what I like to call the “Sovereign Stack” and it’s a set of software that ideally every Sovereign Individual will run themselves. With the lowering of the price for computational power and internet connectivity, I think that it’s a realistic prospect. From running Urbit to interact with your peers in the Urbit network to running a bitcoin node to verify your assets yourself and self-host your email server for truly private email.
Home-Urbit is the first iteration of this Sovereign Stack, exploring the creation of a turn-key deployment for anyone that happens to own an ARM64 or x86 based home server.
Architecture
When deciding on the foundation of this system, I wanted something that enabled the user to install it with a single action. It had to be easy, dependable and above all, reproducible.
Lightweight virtualization was the perfect solution, opting to go the way of Linux containers.
Every service is a self-contained Linux container, with all containers sharing the same Linux kernel of the host OS.
~clean, isn’t it?
Now, I needed a platform to easily deliver the software to the device. Moreover, I would need to be able to easily have terminal access to run commands and view the logs. A container orchestrator would greatly help in properly managing the lifecycle of every service. With that set of requirements, the choice of using the balena ecosystem was obvious to me.
balena is both an IoT container-optimized OS and a platform for IoT DevOps. It builds the containers remotely, delivers them to the device, and manages the lifecycle of both the device and its services. The OS is open source, thus we can continue using balenaOS for its ability to run containers efficiently without the platform.
One of the most useful features of balena is that the project’s containers are not built on the device itself but on remote build servers. Balena will deliver the final images to be run on the device as containers, saving the devices from a time-consuming and resource-intensive image build. On top of that, it offers delta updates, further saving us time on every new release of our software suite.
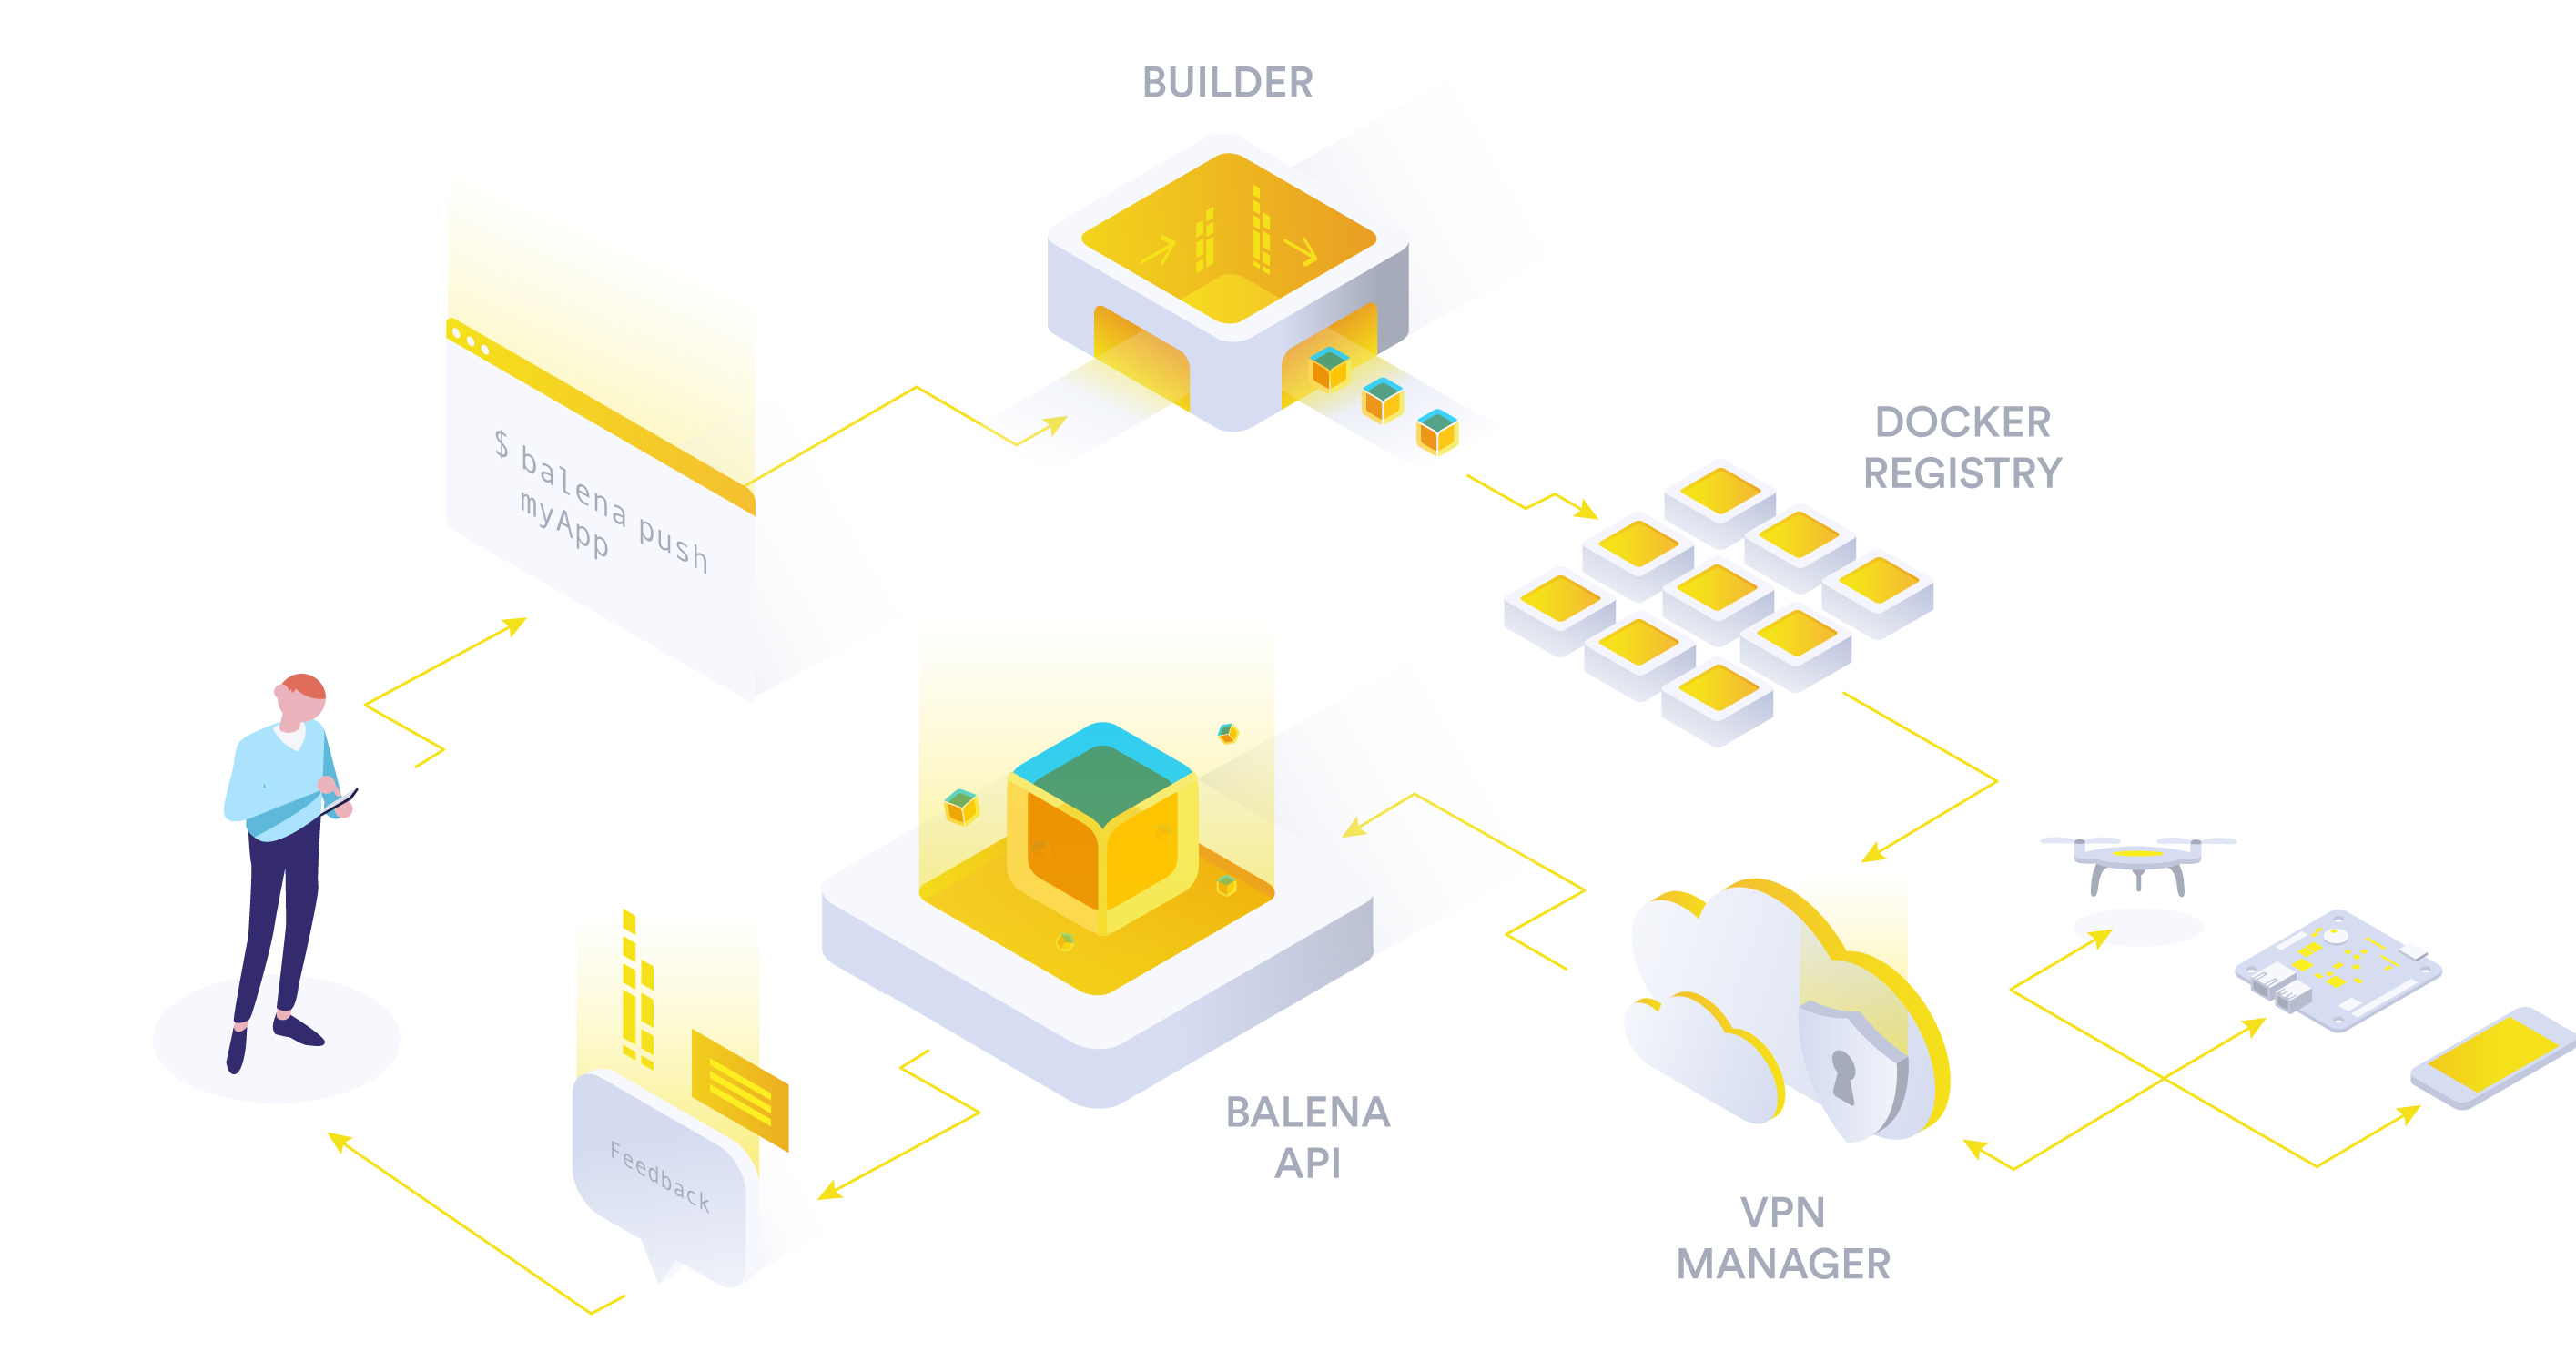
So, the project consists of a set of containers, cleanly defined in the docker-compose.yaml file. It’s trivial to add or remove services based on the setup that we want to field. Moreover, it’s platform-agnostic, as it can be set up as easily in a Raspberry with Debian and in a balenaOS device.

MVP
Currently, Home-Urbit has successfully launched its MVP with a minimal stack that is required to run and monitor Urbit.
You can follow the Getting Started Guide on GitHub and get up to speed in a matter of minutes.
- Nginx: used as a reverse proxy to easily access the services from the browser
- Netdata: Used to monitor the device. It’s both lightweight, batteries-included with a host of supported data sources and an alerting system.
- Minio: Used to store assets that are sent via Urbit. It’s an S3-compatible local data store.
- Urbit
The MVP leveraged the Deploy with Balena feature, which enables 1-click deployments of GitHub repositories.
Balena will read the repository, create a software release for it and finally create a device fleet that runs the release. The user only needs to click on the button, sign up and finally download an OS image that is used to add devices to the fleet. As soon as the image is flashed to the SD card and inserted into the device, it will boot, connect to the internet, and download the latest release.
It saves the user hours of manually deploying the device and every individual service.
It takes 5 minutes.
Urbit grant and Roadmap
With the MVP at hand, it was time to submit for an Urbit grant, which was accepted and it’s officially active.
The vision for this project is to create the foundation for the Sovereign Stack. The sovereign stack should be as easy to set up and install, as it’s installing an app on macOS. With containers, such as setup is possible, and the recent Raspberry Pi models have more than enough computational power.
Short term
The short term goals are to refine the current setup by:
- Supporting x86 architecture
- Replacing path-based routing to sub-domain-based. It’s cleaner and what the services expect, thus less error-prone.
- Replacing Nginx with a simpler reverse proxy. This has the added benefit that Nginx, for some reason, was slowing the front-end of Urbit. Being a React-based dashboard, I suspect that it required some arcane nginx configuration option that I omitted.
- Refine onboarding. It should be easy for the user to access the device on the local network and set up Urbit, either sending an existing pier or a new key file.
Midterm
The midterm goal is to explore and implement a frictionless networking solution for the Home-Urbit, as we can expect it to live behind a house router. Port forwarding and UPnP are notoriously hit and miss, with every different router (even models, let alone manufacturers) having different configurations.
The idea is to use an inexpensive VM on a cloud provider, as a networking gateway for Home-Urbit. Home-Urbit will initiate a constant connection to that gateway, piping all its network via the Gateway.
When an external device wants to connect to Home-Urbit, it will connect to the IP of that VM.
This is important because it enables us to:
- Access our services from the outside
- Host content on our S3-compatible data store that others can access (say an image)
- Leverage Urbit’s P2P connectivity. Urbit is designed to communicate over IP/UDP, using an encrypted networking protocol called ames. If an Urbit can’t directly reach another Urbit, they use an intermediary infrastructure called a Galaxy (a special kind of Urbit). This adds considerable latency to the experience, as messages have to be routed through a Galaxy to reach our Urbit.

There is a big difference between using a tiny VM as a public static IP gateway and hosting the stack on it. Urbit’s packages are encrypted, thus impossible for the VM to read the content.
In case of a crackdown and a VM shutdown, the user can simply use another provider to set up the gateway VM. Due to the envisioned architecture, it should be as easy as pulling a container image and running it. If we go a step further and use a VPN service or Tor, the gateway server could even be oblivious to the IP of our house Internet connection. It simple receives a connection that is kept open and it either pipes all incoming network to that tunnel, or relays the network coming from the tunnel to the wider internet.
The data is yours and yours only. We combine the best of data ownership with the UX of a server that is publicly accessible with a static IP.
Long Term
The final milestones consist of offering the choice to completely decoupled from the balena platform, using either balenaOS or another container-optimized OS.
As we want to create a sovereign stack of software, it’s important to be able to decouple from every possible source of centralization. I want the users to have the choice between maxing out the UX or privacy and decentralization.
Security and privacy is a spectrum, not a binary state. I think there is an argument to be made for allowing users to choose how much UX they want to exchange for increased privacy/security.
The end game is to create actual hardware that anyone can order and have delivered. Their plug n’ play Urbit, theirs forever to install the software that is most important to them.
Next steps, CTA
Currently, I am working on the Short-term goals, having just implemented a Caddy reverse proxy. I am also preparing to participate at the first Urbit unconference: Assembly.
The source code is in the open and I intend to improve its documentation and testing so that it’s easier for people to collaborate on.